How to Choose Commercial LED Lighting: A Complete Step-by-Step Guide
Introduction
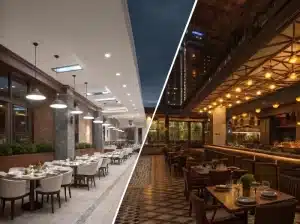
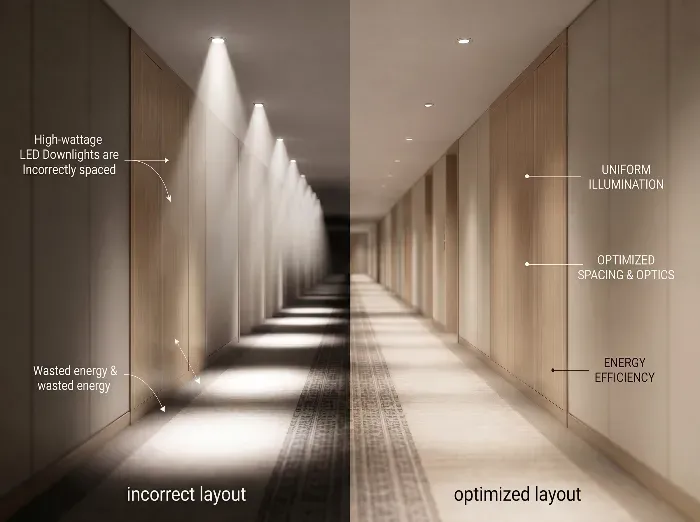
Choosing commercial LED lighting is not simply a matter of selecting a fixture and checking the wattage. In real projects, lighting performance depends on the entire system: application type, target illuminance, beam distribution, color quality, glare control, dimming compatibility, installation conditions, and supplier consistency.
For importers, contractors, and project buyers, poor selection creates direct business risk. The result is often site delays, repeated commissioning, visible flicker, dimming failure, uncomfortable visual environments, client complaints, and warranty disputes between fixture supplier, driver supplier, and control supplier. In commercial projects such as hotels, corridors, lobbies, retail spaces, and offices, these issues quickly translate into rework cost and reputation damage.
A structured selection process reduces these risks. The correct path is practical and sequential: define the application, calculate lighting levels, select beam angle, confirm color performance, control glare, verify dimming and controls, shortlist products, review layout, and evaluate the supplier’s engineering reliability before purchase.
Executive Summary
Commercial LED lighting should be selected in sequence: application, lux target, beam angle, CCT, CRI, glare, dimming, product structure, layout, and supplier capability. This approach reduces commissioning risk, improves user comfort, and lowers long-term maintenance cost.
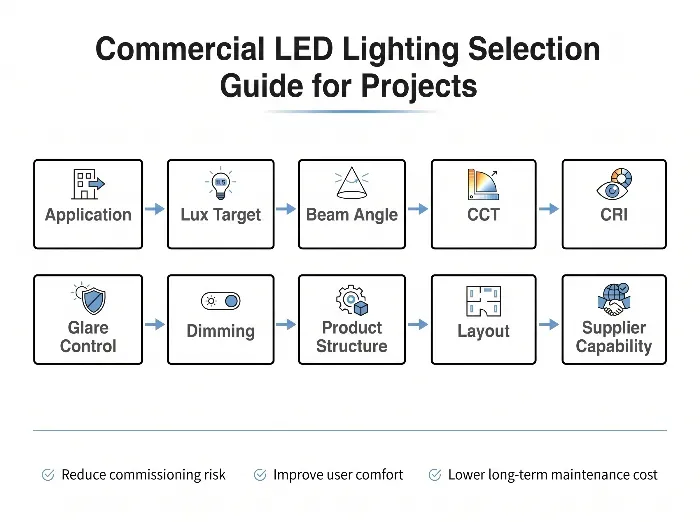
commercial led lighting selection guide for projects
1.Introduction
On-Site / Commercial Reality
Many commercial lighting problems start before installation. The wrong fixture is often approved because selection was based on unit price or appearance rather than system compatibility. Once products arrive on site, beam spread is wrong, glare is too high, dimming is unstable, or the lux level does not meet the design brief. At that stage, correction is expensive.
Deep Dive & Engineering Solution
A commercial LED lighting decision should follow a technical workflow rather than a catalog workflow. The correct sequence is:
| Selection Step | What Must Be Defined | Impact on Maintenance / ROI |
|---|---|---|
| Aplicación | Hotel, office, retail, corridor, lobby, restaurant | Prevents underperformance and redesign |
| Lighting level | Target lux1 by task and space | Avoids over-lighting and wasted energy |
| Ángulo del haz | Narrow, medium, wide distribution | Reduces dark spots and excess fixture count |
| CCT / CRI | Temperatura de color2 and color rendering3 | Protects visual comfort and presentation quality |
| Glare | UGR4 and cutoff control | Improves user comfort and compliance |
| Dimming | Driver and dimmer compatibility | Reduces flicker, failure, and call-backs |
| Product structure | Thermal design, optics, IP rating5 | Extends service life and reduces RMA |
| Supplier | Batch consistency and test discipline | Reduces project risk and after-sales disputes |
This step-by-step method is especially important for B2B buyers handling multi-room or multi-floor projects, where a small selection error scales quickly.
Factory Note
From a manufacturing perspective, the most expensive mistake is not usually a defective component. It is approving the wrong specification across an entire batch. Correcting specification errors after delivery costs far more than validating the lighting system in advance.
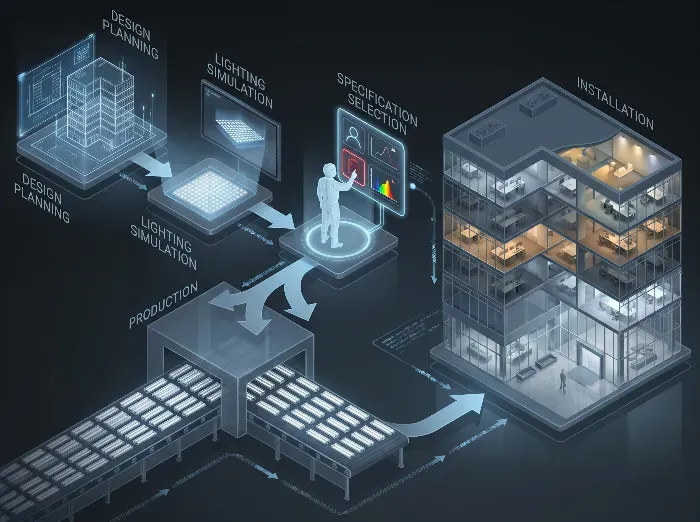
commercial led lighting engineering workflow
2.Why Commercial LED Lighting Matters
On-Site / Commercial Reality
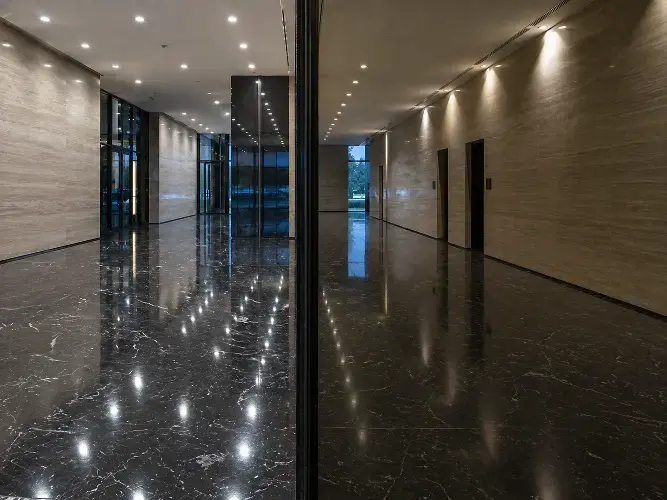
Commercial lighting affects more than visibility. It influences guest comfort, retail presentation, staff efficiency, safety perception, and energy cost. In hospitality and commercial interiors, lighting quality is experienced immediately, while lighting failure is noticed even faster.
Deep Dive & Engineering Solution
A proper LED solution must balance four commercial requirements:
- Visual performance
- Control compatibility
- Installation practicality
- Lifetime operating cost
Low-cost products often fail because they optimize only the initial purchase price. In many projects, this leads to flicker, poor dimming curves, color inconsistency between batches, and unstable driver performance. These problems are particularly visible in reception areas, guest corridors, restaurants, and meeting spaces.
| Project Priority | Poor Selection Outcome | Commercial Impact |
|---|---|---|
| Stable dimming | Flashing, dropout, limited dimming range | Client complaints and commissioning delays |
| Low glare | Visual discomfort | Reduced occupant satisfaction |
| Color consistency | Visible mismatch between fixtures | Poor project finish quality |
| Reliable electronics | Early failures | Higher maintenance access cost |
| Correct optical distribution | Patchy lighting | More fixtures or redesign required |
Factory Note
In large hospitality projects, lighting quality is judged at the scene level, not the fixture level. Even if individual luminaires pass basic function tests, inconsistent beam quality, color shift, or dimming instability can still damage the final project result.
why commercial led lighting matters in hospitality and office projects
3.Step 1 – Identify Your Application
On-Site / Commercial Reality
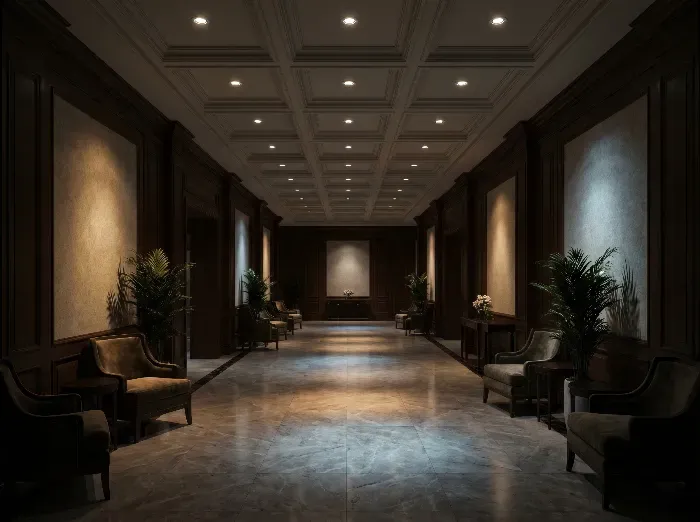
The same lamp cannot serve every commercial space effectively. A lobby, corridor, guest room, retail display, and back-of-house area each require different light distribution, glare control, color appearance, and control logic. If the application is not defined first, the rest of the selection process becomes guesswork.
Deep Dive & Engineering Solution
Start by identifying the use case:
- General ambient lighting
- Accent lighting
- Task lighting
- Decorative lighting
- Wet or semi-outdoor application
- Dimmable scene lighting
- 24/7 circulation area lighting
Typical examples:
| Aplicación | Primary Requirement | Typical Selection Focus | Impact on Maintenance / ROI |
|---|---|---|---|
| Hotel corridor | Uniformity, low glare, long operating hours | Wide beam, stable driver, dimmable if needed | Reduces maintenance frequency |
| Lobby | Layered scene effect, premium appearance | Dimming, high CRI, glare control | Improves client perception |
| Retail display | Product emphasis | Narrow beam, high CRI | Better merchandise presentation |
| Office | Visual comfort | UGR control, neutral CCT | Supports occupant comfort |
| Bathroom / humid area | Moisture resistance | Correct IP rating | Prevents premature failure |
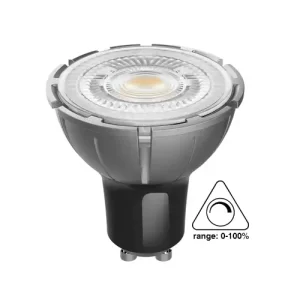
Where retrofit projects use GU10 lamps, compatibility with existing housings and dimmers must be checked early. This is particularly important when replacing halogen systems with LED alternatives.
Factory Note
During hotel commissioning, the biggest application error is treating decorative and functional lighting as the same category. They may share a cutout size, but their optical and control requirements are usually very different.
4. Step 2 – Define Lighting Levels (Lux)
On-Site / Commercial Reality
If the lux target is too low, the space feels dim and underperforming. If it is too high, the project wastes energy, increases glare, and often creates an over-lit environment that feels harsh rather than premium.
Deep Dive & Engineering Solution
Lux targets should be set according to the actual visual task and commercial environment, not by copying a generic wattage from a previous project.
Typical reference ranges:
| Space Type | Typical Lux Range | Selection Impact | Impact on Maintenance / ROI |
|---|---|---|---|
| Hotel corridor | 100–150 lux | Balanced ambient lighting | Lower energy use |
| Lobby | 200–300 lux | Layered lighting recommended | Better guest experience |
| Restaurant | 150–300 lux | Often dimmable by scene | Flexible operation |
| Office work area | 300–500 lux | Requires uniform distribution | Supports task visibility |
| Retail display | Depends on accent ratio | Beam angle becomes critical | Better visual merchandising |
Lux must be considered together with:
- Mounting height
- Ángulo del haz
- Reflectance of wall and ceiling surfaces
- Fixture spacing
- Dimming strategy
A low-wattage lamp can still achieve the required lux if the beam and layout are correct. Conversely, a higher-wattage lamp can still fail if light is distributed inefficiently.
Factory Note
From a manufacturing perspective, many overpowered specifications are actually layout problems. When spacing and optics are not defined properly, buyers compensate by increasing wattage, which raises cost without solving visual quality.
define commercial lighting lux levels correctly
5. Step 3 – Choose Beam Angle
On-Site / Commercial Reality
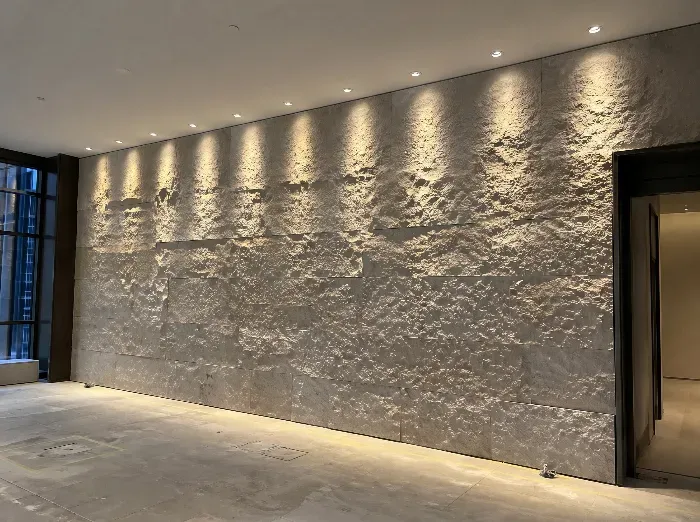
Beam angle errors are among the most common causes of on-site dissatisfaction. A beam that is too narrow creates scalloping and hot spots. A beam that is too wide reduces emphasis and lowers useful illuminance at the target surface.
Deep Dive & Engineering Solution
Beam angle selection should match the application, ceiling height, and spacing.
| Ángulo del haz | Best Use Case | Limitation | Impact on Maintenance / ROI |
|---|---|---|---|
| 15°–24° | Accent, artwork, retail highlighting | Too narrow for general lighting | Fewer fixtures for focal points |
| 36° | Mixed-use accent and ambient | Requires spacing review | Flexible for many applications |
| 60°+ | General lighting, corridors, low ceilings | Weak emphasis for displays | Better uniformity if layout is correct |
For GU10 and spotlight projects, beam quality matters as much as nominal angle. Two lamps both marked 36° may perform differently if the optic design, lens accuracy, and chip position are inconsistent.
A proper beam decision should consider:
- Target object or surface size
- Distance from luminaire to target
- Required contrast ratio
- Ceiling height and fixture spacing
- Whether the project prioritizes ambience or task visibility
For deeper explanation, this topic should be linked to the dedicated beam angle article.
Factory Note
From a manufacturing perspective, beam angle consistency is often overlooked in low-cost sourcing. On paper, the specification may match. In practice, optical variation between batches creates visible inconsistency across the ceiling.
6. Step 4 – Select CCT & CRI
On-Site / Commercial Reality
Incorrect color temperature or low color rendering can make a commercial space feel uncomfortable, flat, or unnatural. This directly affects guest perception, retail presentation, and brand image.
Deep Dive & Engineering Solution
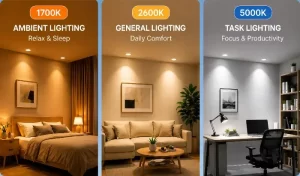
CCT defines the visual warmth or coolness of the light. CRI indicates how accurately colors appear under that light source.
Typical guidance:
| Parameter | Typical Choice | Best Application | Impact on Maintenance / ROI |
|---|---|---|---|
| 2700K | Warm, relaxed atmosphere | Hospitality, restaurants, guestrooms | Supports premium ambience |
| 3000K | Warm-neutral | Hotels, residential-style commercial areas | Common project standard |
| 4000K | Neutral white | Offices, retail, circulation areas | Functional and efficient |
| CRI 80 | Standard commercial use | General applications | Lower cost baseline |
| CRI 90+ | Premium color rendering | Retail, hospitality, food presentation | Better visual quality |
Do not evaluate CCT and CRI independently. A hospitality project may prefer 2700K or 3000K, but if CRI is low, finishes and materials can still look dull. Likewise, high CRI without stable binning can lead to visible color inconsistency between luminaires.
Factory Note
In large hospitality projects, color consistency between production batches is often more important than chasing an aggressive paper specification. A stable 3000K with controlled batch variation usually performs better on site than an inconsistent premium claim.
7. Step 5 – Glare Control (UGR)
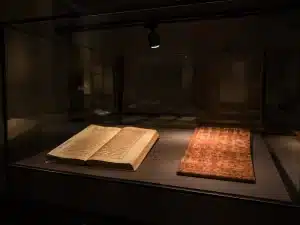
On-Site / Commercial Reality
Glare complaints are common in offices, reception areas, and hospitality spaces with reflective finishes. Once glare becomes visible, it is difficult to solve without changing fixtures, accessories, or layout.
Deep Dive & Engineering Solution
UGR is a practical indicator for visual discomfort. In commercial projects, glare is influenced by:
- Optic design
- Recess depth
- Shielding angle
- Mounting height
- Surface reflectance
- Viewing direction
A high-output fixture without proper shielding may meet the lux target but still fail the user experience.
| Glare Control Method | Beneficio | Limitation | Impact on Maintenance / ROI |
|---|---|---|---|
| Deep recessed source | Better visual comfort | May reduce output | Lower complaint risk |
| Honeycomb / louver | Reduces direct glare | Can reduce efficiency | Better occupant comfort |
| Wider fixture spacing with lower output points | More balanced field | Requires layout planning | Better overall lighting quality |
| Dedicated low-UGR optic | Strongest engineered solution | Higher product cost | Lower rework cost |
Factory Note
During hotel and office commissioning, glare is one of the most underestimated issues because it may not be obvious on the sample board. It becomes visible only after full installation, especially against polished stone, glass, or glossy finishes.
glare control ugr in commercial led lighting
8. Step 5 – Dimming & Smart Controls
On-Site / Commercial Reality
Dimming is one of the highest-risk areas in LED projects. Many problems only appear after installation: lamps flashing at low level, limited dimming range, mismatch between channels, audible noise, or complete incompatibility with legacy dimmers.
Deep Dive & Engineering Solution
LED loads behave very differently from halogen loads. Traditional dimmers were designed for higher-wattage resistive loads, while LED drivers are low-wattage and non-linear. This mismatch often causes instability unless the lamp driver and dimmer are tested as a complete system.
Common control options include:
| Control Type | Best Use Case | Main Risk | Impact on Maintenance / ROI |
|---|---|---|---|
| TRIAC | Retrofit, GU10 replacement, legacy systems | Compatibility varies by dimmer | Convenient if verified in advance |
| 0/1–10V | Commercial analog control | Extra wiring required | Stable in planned installations |
| DALI | Advanced scene and addressable control | Higher system complexity | Good for large projects |
| Wireless control | Retrofit and flexible zoning | Ecosystem compatibility | Lower rewiring cost |
For retrofit GU10 applications, dimming validation is essential. A lamp may dim perfectly on one dimmer and fail on another. This topic should link directly to the dedicated dimming article.
Factory Note
From a manufacturing perspective, dimming compatibility cannot be assumed from datasheet labels alone. It must be verified through real dimmer-driver-lamp testing across the operating range, including startup, low-end dimming, and multiple units on one circuit.
9. Step 6 – Final Product Selection
On-Site / Commercial Reality
At the final selection stage, buyers often compare only wattage, lumen output, and price. That is where many project problems begin. Two products with similar headline specifications can perform very differently in service life, compatibility, and visual result.
Deep Dive & Engineering Solution
Final product selection should include the following checks:
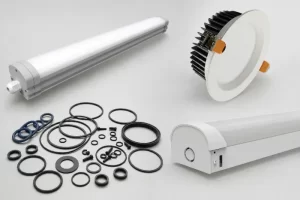
- Correct cutout or lamp base compatibility
- Thermal design and heat dissipation
- Driver quality
- Flicker performance9
- Dimming validation
- Beam consistency
- CCT consistency
- Required IP rating
- Replaceability and service access
- Compliance documentation
| Product Checkpoint | Why It Matters | Impact on Maintenance / ROI |
|---|---|---|
| Thermal structure | Protects LED and driver life | Lower failure rate |
| Low flicker design | Supports visual comfort | Fewer complaints |
| Driver quality | Affects dimming and stability | Lower call-back risk |
| IP rating | Matches environment | Reduces premature failure |
| Replaceability | Easier service | Lower labor cost |
If the project includes bathrooms, covered outdoor areas, or humid zones, the correct IP specification should be confirmed. This section should also link to the IP rating article.
Factory Note
From a manufacturing perspective, early LED failures are often not caused by the LED package itself. They usually come from thermal stress, driver instability, or component variation that was not adequately screened during production verification.
10. Step 7 – Lighting Layout Basics
On-Site / Commercial Reality
Even a good fixture can perform badly in a poor layout. Incorrect spacing, poor alignment, and mismatch between beam angle and ceiling height create dark zones, glare, or uneven brightness that the client notices immediately.
Deep Dive & Engineering Solution
Basic layout review should include:
- Ceiling height
- Fixture spacing
- Distance from wall
- Ángulo del haz
- Target lux
- Uniformity requirement
- Accent-to-ambient ratio
A simple layout check before ordering can avoid costly on-site adjustment.
| Layout Factor | Common Error | Result | Impact on Maintenance / ROI |
|---|---|---|---|
| Spacing too wide | Dark patches | More fixtures added later | Higher total cost |
| Spacing too tight | Over-lighting and glare | Energy waste | Poor visual comfort |
| Wrong wall offset | Uneven wall wash | Poor appearance | Rework risk |
| Same layout for all beams | Optical mismatch | Inconsistent lighting | Delayed commissioning |
Factory Note
During hotel commissioning, layout issues are often blamed on the fixture, while the real cause is spacing copied from a different beam angle or ceiling height. Layout and optics must be reviewed together.

commercial lighting layout basics for led projects
11.Final Selection Checklist
On-Site / Commercial Reality
Procurement teams often need a fast approval tool before placing an order. Without a checklist, key risks are missed, especially under project deadline pressure.
Deep Dive & Engineering Solution
Use this shortlist before final approval:
| Checklist Item | Verified? | Impact on Maintenance / ROI |
|---|---|---|
| Application defined clearly | Yes / No | Prevents wrong product category |
| Lux target confirmed | Yes / No | Avoids over- or under-lighting |
| Beam angle matched to layout | Yes / No | Reduces visual defects |
| CCT and CRI approved | Yes / No | Protects project appearance |
| Glare control reviewed | Yes / No | Improves user comfort |
| Dimming/control compatibility tested | Yes / No | Reduces commissioning failure |
| IP requirement checked | Yes / No | Avoids environmental failure |
| Flicker performance reviewed | Yes / No | Supports comfort and compliance |
| Sample approved from production-standard batch | Yes / No | Reduces batch mismatch |
| Supplier test capability reviewed | Yes / No | Lowers after-sales risk |
Factory Note
From a manufacturing perspective, the safest sample is not a hand-built engineering sample. It is a sample that represents actual production materials, driver version, and assembly process.
12. Recommended Solutions
On-Site / Commercial Reality
Different project types require different product priorities. A universal recommendation is rarely reliable for B2B procurement.
Deep Dive & Engineering Solution
Recommended direction by scenario:
| Project Type | Recommended Focus | Typical Product Direction | Impact on Maintenance / ROI |
|---|---|---|---|
| Hotel retrofit | Dimming compatibility, warm CCT, low glare | Dimmable GU10 or retrofit downlight | Lower rewiring cost |
| New-build hospitality | Scene control, color consistency, premium finish | Dedicated dimmable downlight system | Better guest experience |
| Office | UGR control, 4000K, stable driver | Low-glare downlight or panel | Better comfort and productivity |
| Retail | High CRI, controlled beam angles | Accent spotlight system | Better merchandise presentation |
| Humid areas | Correct IP grade, stable sealing | IP-rated downlight | Longer service life |
For retrofit lamp-based projects, a verified GU10 dimmable solution is often the practical path when existing infrastructure must be retained.
Factory Note
In large hospitality renovations, keeping the existing control infrastructure can save substantial cost, but only if LED lamp compatibility is tested in advance rather than assumed.
recommended commercial led lighting solutions by application
13. Common Mistakes to Avoid
On-Site / Commercial Reality
Most commercial lighting failures come from predictable decision errors rather than random defects.
Deep Dive & Engineering Solution
Common mistakes include:
- Buying on wattage alone
- Ignoring beam angle
- Choosing CCT without reviewing material finishes
- Using dimmable lamps without dimmer validation
- Overlooking flicker performance
- Failing to check IP requirements
- Approving non-representative samples
- Choosing suppliers with unstable batch control
- Treating all commercial spaces with one lighting rule
| Mistake | Immediate Outcome | Longer-Term Cost Impact |
|---|---|---|
| Lowest-price sourcing only | Inconsistent performance | Higher replacement and complaint cost |
| No dimming test | Flashing or dropout | Commissioning delay |
| Wrong beam angle | Uneven lighting | Re-layout or re-order |
| No supplier audit | Batch inconsistency | Higher RMA and reputational risk |
Factory Note
From a manufacturing perspective, the phrase “same as last time” is risky unless the BOM, driver version, LED bin, and optical parts are all controlled. Small changes in components can produce large differences on site.
14. How to Choose a Reliable Supplier
On-Site / Commercial Reality
A supplier is not reliable because the sample looks good. Reliability is proven by process control, technical response speed, compatibility knowledge, and batch consistency.
Deep Dive & Engineering Solution
A dependable commercial lighting supplier should provide:
- Production-standard samples
- Dimming compatibility guidance
- Batch consistency control
- Aging and burn-in verification
- Flicker and electrical performance data
- Clear warranty responsibility
- Stable communication during project execution
- Ability to review layout and application requirements
| Supplier Evaluation Point | What to Ask | Impact on Maintenance / ROI |
|---|---|---|
| Batch control | How is color and driver consistency managed? | Lower mismatch risk |
| Dimming support | Which dimmers have been tested? | Fewer site issues |
| Quality verification | Is aging or burn-in done before shipment? | Lower early failure rate |
| Technical support | Can they review application and load schedule? | Better system fit |
| Complaint handling | Who takes responsibility for compatibility issues? | Faster resolution |
Factory Note
From a manufacturing perspective, the most useful supplier is the one that identifies project risk before shipment, not the one that only responds after failure occurs on site.
15. Conclusion + CTA
On-Site / Commercial Reality
Commercial lighting selection becomes difficult only when key decisions are made out of sequence. When application, lux, beam angle, color quality, glare, control method, product structure, and supplier capability are reviewed step by step, project risk drops significantly.
Deep Dive & Engineering Solution
The most effective selection path is clear:
application → lighting level → beam angle → CCT/CRI → glare control → dimming/control system → product selection → layout review → supplier verification
This method helps reduce:
- Installation errors
- Dimming incompatibility
- Visual discomfort
- Excess energy use
- Warranty disputes
- Long-term maintenance cost
If your project involves GU10 retrofit lamps, dimming compatibility, beam angle selection, or IP-rated applications, review the related product and technical pages before approval:
- GU10 product page
- Dimming article
- Beam angle article
- IP rating article
Factory Note
During hotel commissioning, the projects that run smoothly are usually not the ones with the cheapest fixture. They are the ones where the system was verified before ordering.
Conclusion: Business Value
A step-by-step commercial LED lighting selection process improves reliability, reduces commissioning issues, lowers maintenance effort, and controls lifetime system cost. For B2B buyers, the goal is not only product performance but predictable project delivery with stable batch quality and verified control compatibility.
B2B Engineering Recommendation
For large projects with specific dimming requirements, request the load schedule. The Teco engineering team will simulate the system in-lab to verify compatibility before mass production.
Footnotes
-
Lux is the unit of illuminance, indicating how much light falls on a surface. ↩
-
CCT, or correlated color temperature, describes whether light appears warm, neutral, or cool. ↩
-
CRI, or color rendering index, measures how accurately a light source reveals object colors compared with a reference source. ↩
-
UGR, or unified glare rating, is a standard method used to assess visual discomfort caused by glare. ↩
-
IP rating, or ingress protection rating, indicates resistance to dust and water penetration. ↩
-
TRIAC or phase-cut dimming reduces light output by cutting part of the AC waveform. ↩
-
0/1–10V dimming controls light output through a low-voltage analog signal. ↩
-
DALI is a digital addressable lighting control protocol used in commercial systems. ↩
-
Flicker is the rapid variation of light output over time, which can affect visual comfort and perceived quality. ↩