Quick Answer: How to Position Retail Spotlights
- Use a 30°–45° lighting angle to avoid glare and shadows
- Elegir beam angles between 15°–40° based on display size
- Maintain 1000–3000 lux for most retail displays
- Position fixtures 1.0–2.0m from display targets
For most retail stores:
30° angle + 24°–36° beam = best balance of focus and uniformity
Introducción
Retail spotlight positioning is one part of a complete retail lighting strategy, including ambient and general lighting design.
In commercial retail fit-outs, improper retail spotlight positioning is one of the most common causes of commissioning delays and costly rework.
Poor lighting placement leads to:
- uneven illumination across displays
- visible shadows on mannequins and shelves
- glare that reduces product clarity
- inconsistent lighting across zones
According to guidance from the Illuminating Engineering Society, lighting quality directly impacts visual perception and retail performance, making proper spotlight positioning critical for both engineering execution and commercial outcomes.
For contractors and distributors, these issues often translate into:
- 20–30% increased labor costs during re-adjustment
- delayed store openings
- client dissatisfaction and potential project penalties
Retail Spotlight Positioning Decision Guide

To simplify real-world decisions:
- Mannequins → 30° angle + 24° beam
- Shelves → 35°–45° + 36° beam
- Jewelry → 30° + 15° narrow beam
- Window displays → 20°–30° + wider beam
Best practice:
Match beam angle to display size, y lighting angle to viewing direction
Why Retail Spotlight Positioning Matters
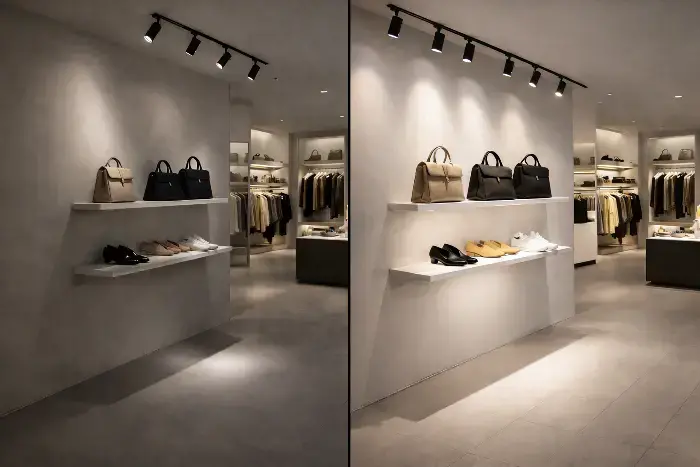
Before-and-after comparison of boutique lighting, illustrating how improved illumination enhances the visibility and presentation of apparel, accessories, and footwear on display shelves.
Real Project Impact
Improper spotlight positioning frequently results in:
- dark zones on key merchandise
- uneven brightness distribution
- repeated on-site adjustments
This increases installation time and reduces lighting performance consistency.
Engineering Perspective
Retail lighting is based on controlling contrast and direction, not just brightness.
The principles are derived from photometric laws such as the
Inverse Square Law and
Lambert’s Cosine Law.
These determine how light spreads and how effectively it illuminates surfaces.
Reference:
CIE Lighting Standards – https://cie.co.at/publications
The 30°–45° Rule for Retail Lighting
El 30°–45° rule is the most widely used guideline in retail lighting design.
Why It Works
- <30° → harsh shadows and overly dramatic contrast
-
45° → increased glare and flattened lighting
Practical Application
| Angle | Aplicación | Effect |
|---|---|---|
| 30° | Luxury displays / mannequins | Strong contrast |
| 35°–40° | General retail | Balanced |
| 45° | Wall displays | Uniform lighting |
Quick Engineering Formula
To achieve a 30° lighting angle:
D = (H_ceiling − H_target) × tan(30°)Example:
- Ceiling height: 3.0m
- Display height: 1.2m
Offset ≈ 1.0m
This aligns with retail lighting recommendations from
CIBSE LG9 Guide: https://www.cibse.org/knowledge-research/knowledge-portal/lighting-guides
30° vs 45°: Focus vs Uniformity
-
30° → “Museum effect”
- Strong contrast
- Ideal for luxury and jewelry
-
45° → “Commercial wash”
- Even illumination
- Suitable for apparel and shelves
Choose based on whether emphasis or uniformity is required
How Beam Angle Affects Visibility
Beam angle defines how light spreads across a surface.
Aplicaciones típicas
| Ángulo del haz | Aplicación | Effect |
|---|---|---|
| 15° | Jewelry | High focus |
| 24°–36° | Mannequins | Balanced |
| 40°–60° | Shelves | Wide coverage |
For a more detailed comparison of beam angles such as 24° vs 36°, refer to our guide on spotlight beam angle selection.
Reference:
Lighting Research Center – https://www.lrc.rpi.edu/programs
Recommended Spotlight Placement by Retail Area
| Area | Angle | Beam | Spacing |
|---|---|---|---|
| Walls | 40°–45° | 36° | 1.2–1.5m |
| Mannequins | 30° | 24° | 1.0–1.2m |
| Windows | 20°–30° | 36°–60° | 0.8–1.0m |
Uso one dominant light direction per zone to avoid shadow overlap
Recommended Illuminance Levels
| Display Type | Avg Lux | Peak Lux |
|---|---|---|
| Apparel | 1000–2000 | 3000 |
| Jewelry | 2000–4000 | 5000+ |
| Cosmetics | 1500–3000 | 4000 |
Reference:
IES Lighting Handbook – https://www.ies.org/store/
Color Quality Consideration (CRI & R9)
For retail spotlight positioning:
- CRI > 90 ensures overall color accuracy
- R9 > 50 enhances red tones and product vibrancy
Especially critical for apparel, cosmetics, and fresh products
For detailed explanation, refer to your CRI article (internal link recommended)
Glare Control (UGR) in Retail Lighting
When spotlight angles exceed 45°, glare risk increases.
To reduce visual discomfort:
- Uso deep-recessed fixtures
- Add honeycomb louvers
- Maintain UGR < 19
Reference:
EN 12464-1 Standard – https://standards.iteh.ai
Track Lights vs Recessed Spotlights
- Track lights → flexible, ideal for changing displays
- Recessed spotlights → fixed, clean ceiling design
Choose based on layout flexibility and design intent
Common Spotlight Positioning Mistakes
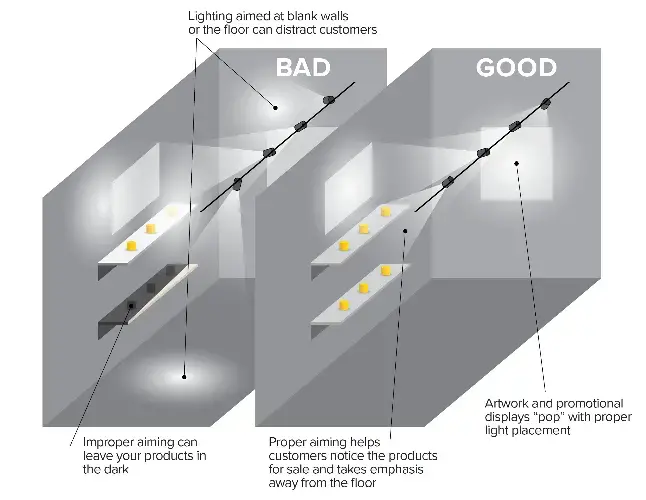
Side-by-side illustration showing poor lighting that distracts from products versus effective lighting that highlights displays and artwork for improved visual merchandising.
- Vertical lighting → glare
- Overlapping beams → hotspots
- Excessive spacing → dark zones
- Incorrect beam angle → uneven lighting
Result: increased rework and poor display performance
Practical Example: 3m Ceiling Retail Layout

- Grid spacing: 1.2–1.5m
- Beam: 24°–36°
- Tilt: 30°–40°
Resultado:
- ~1200 lux average
- Uniformity >0.8
Validated using DIALux evo
To ensure stable lighting performance, it is also important to consider parpadeo y dimming compatibility in LED systems.
Best Practices for Retail Spotlight Positioning
- Use angled lighting (30°–45°)
- Match beam angle to display width
- Maintain 3:1 contrast ratio
- Avoid direct overhead lighting
- Use high CRI + adequate R9
These principles apply across most retail environments
Conclusión
Effective retail spotlight positioning combines:
- correct angles
- proper beam selection
- controlled spacing
- high-quality light
For most projects:
30°–45° angle + 24°–36° beam = optimal retail lighting solution
Free Retail Lighting Simulation for Your Project
Worried about delays caused by on-site adjustments?
Our engineering team provides:
- Dialux-based 3D lighting simulations
- Pre-calculated spotlight layouts
- Verified lux and uniformity results