Как выбрать угол луча для светодиодных прожекторов (узкий и широкий луч в зависимости от высоты потолка)
Узкий и широкий луч: краткий ответ
Узкий луч (15°–30°) → высокая интенсивность, малая площадь покрытия → лучше всего подходит для высокие потолки и акцентное освещение
Широкий луч (60°–90°) → низкая интенсивность, большая площадь покрытия → лучше всего подходит для низкие потолки и общее освещение
Эмпирическое правило:
Потолок выше 4м → используйте узкий луч
Потолок ниже 3 м → используйте широкий луч
Узкий и широкий луч: сравнение бок о бок
| Характеристика | Узкий луч (15°–30°) | Широкий луч (60°–90°) |
|---|---|---|
| Распределение света | Сфокусированный | Широкое распространение |
| Интенсивность освещения (люкс) | Высокий | Ниже |
| Площадь покрытия | Малый | Большой |
| Лучшее применение | Акцентное освещение | Общее освещение |
| Высота потолка | Высокие потолки | Низкие потолки |
| Контроль бликов | Лучше | Больший риск ослепления |
Когда использовать узкий или широкий луч

Используйте узкий луч (15°–30°) когда:
- Высота потолка > 4м
- Нужно выделить товары или объекты
- Требуется высокая освещенность на определенной площади
Применение:
- розничные витрины
- вестибюли отелей
- галереи
Используйте широкий луч (60°–90°) когда:
- Высота потолка < 3 м
- Нужно равномерное окружающее освещение
- Уменьшить количество светильников
Применение:
- офисы
- супермаркеты
- жилое освещение
Почему узкий луч даёт более высокую освещённость

Сравнительная диаграмма распределения светового пучка для углов 10° (точечный) и 60° (заливающий), показывающая результирующие диаметры покрытия на разных высотах установки.
Разница между узким и широким лучом заключается в концентрации света.
Освещённость подчиняется закону обратных квадратов:
E = I / d²- E = освещённость (люкс)
- I = сила света
d = расстояние
Ссылка:
https://en.wikipedia.org/wiki/Inverse-square_lawКлючевой вывод:
A narrow beam concentrates light into a smaller area, producing 2–4× higher lux than a wide beam at the same height.
Beam Coverage Formula (Practical Calculation)
To compare narrow vs wide beam in real projects:
D ≈ 2 × H × tan(θ/2)- D = beam diameter
- H = mounting height
θ = beam angle
Пример:
At 3m height:
- 30° beam → ~1.6m coverage
60° beam → ~3.5m coverage
Ссылка:
https://www.mathsisfun.com/algebra/trig-tangent.html
Narrow vs Wide Beam by Ceiling Height
| Ceiling Height | Recommended Beam | Причина |
|---|---|---|
| <3m | 60°–90° (Wide) | Better coverage |
| 3–4m | 40°–60° | Сбалансированный |
| 4–6m | 20°–40° (Narrow) | Higher lux |
| >6m | 10°–25° (Narrow) | Deep penetration |
Based on practical IES lighting design principles:
https://www.ies.org/standards/
Manufacturer Insight
In commercial lighting projects:
- Over 60% of lighting complaints are caused by incorrect beam angle selection
- Not by lumen output
For ceilings above 5m:
Using 60° wide beam often results in:
- flat lighting
- insufficient brightness
Recommended solution:
Использовать 24°–36° narrow beam
Improves contrast and visual impact
Beam Angle vs Fixture Spacing
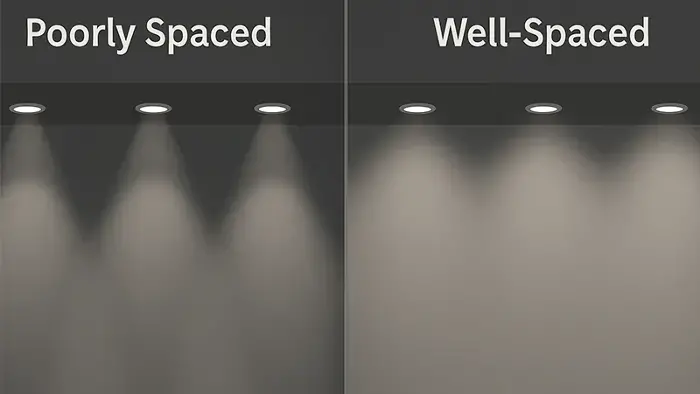
Even with correct beam type, spacing matters.
Spacing ≈ Height × (2 / tan(θ/2))Пример:
3m + 30° → spacing ≈ 3.5m
Real Commercial Applications
Розничное освещение
- 3m ceiling
- 40° beam
- Balanced visibility and coverage
Hotel Lobby
- 5m ceiling
Combine:
- narrow beam (accent)
- wide beam (ambient)
Art Gallery
- 4m ceiling
- 15° narrow beam
High contrast lighting
Reference (retail lighting guide):
https://www.ies.org/store/ies-lighting-for-retail-applications-rp-29-16/
Common Mistakes When Choosing Beam Angle
- Using wide beam for high ceilings
- Using one beam angle everywhere
- Ignoring spacing rules
- Focusing only on lumens
Troubleshooting: Narrow vs Wide Beam Problems
- Too dark → beam too wide
- Too bright spot → beam too narrow
- Uneven lighting → spacing issue
- Flat lighting → no beam layering
Before Buying LED Spotlights (Checklist)
- Ceiling > 4m? → choose narrow beam
- Need accent lighting? → choose narrow
- Need uniform lighting? → choose wide
- CRI ≥ 90? → better visual quality
How Professionals Combine Multiple Beam Angles
In high-end commercial projects, using a single beam angle across the entire space is a common mistake that leads to "flat" and uninspiring environments. Professional designers use Layered Lighting to create depth, focus, and visual comfort.
1.The "Accent + Ambient" Combo
This is the most standard professional setup for retail and hospitality.
The Strategy: Use 15°–24° narrow beams to highlight specific products or features (Accent), and 60° wide beams for general circulation areas (Ambient).
The Benefit: It creates a 3:1 contrast ratio, which naturally draws the customer’s eye to the merchandise while ensuring the space feels bright and safe.
2.The "Wall Washing + Task" Combo
Common in art galleries and modern offices.
The Strategy: Use 36°–45° beams pointed at walls (Wall Washing) to make the space feel larger, combined with 24° beams over desks or exhibits (Task).
The Benefit: It reduces eye strain by providing vertical brightness while maintaining high-intensity light where work is being done.
3.Avoiding "Hot Spots" with Overlapping Beams
When spacing fixtures, professionals aim for a 20%–30% beam overlap.
If beams don’t overlap: You get dark "scallops" on the walls and uneven light on the floor.
If overlap is too high: You waste energy and create "hot spots" that cause glare.
Conclusion: Narrow vs Wide Beam — Which One Is Better?
Neither is “better” — it depends on application
Narrow beam = precision + high intensity
Wide beam = coverage + uniformity
The correct choice depends on:
ceiling height
lighting purpose
spacing design
Инженерная рекомендация для B2B
For commercial projects:
- Request beam angle simulation
- Verify spacing and lux distribution
Use mixed beam strategies
Our engineering team can support Dialux simulation and beam angle optimization before production.