如何根据天花板高度选择LED射灯光束角度(窄光束与宽光束详解)
窄光束与宽光束:快速解答
窄光束(15°–30°) → 高强度,小覆盖范围 → 最适合 高天花板与重点照明
宽光束(60°–90°) → 低强度,大覆盖范围 → 最适合 低天花板和一般照明
经验法则:
天花板高于4米 → 使用窄光束
天花板低于3米 → 使用宽光束
窄光束与宽光束:并排对比
| 特点 | 窄光束(15°–30°) | 宽光束(60°–90°) |
|---|---|---|
| 光分布 | 专注的 | 宽泛分布 |
| 勒克斯强度 | 高 | 降低 |
| 覆盖区域 | 小 | 大 |
| 最佳应用场景 | 重点照明 | 一般照明 |
| 天花板高度 | 高天花板 | 低天花板 |
| 眩光控制 | 更佳 | 眩光风险更高 |
何时使用窄光束与宽光束

在以下情况下使用窄光束(15°–30°):
- 天花板高度 > 4米
- 需要突出产品或物体
- 需要在特定区域达到高照度
应用场景:
- 零售展示
- 酒店大堂
- 画廊
在以下情况下使用宽光束(60°–90°):
- 天花板高度 < 3米
- 需要均匀的环境照明
- 减少灯具数量
应用场景:
- 办公室
- 超市
- 住宅照明
为什么窄光束产生更高的勒克斯值

10°聚光与60°泛光角度光束扩散对比图,展示不同安装高度下的覆盖直径结果。.
窄光束与宽光束的区别在于光的集中程度。.
照度遵循平方反比定律:
E = I / d²- E = 照度(勒克斯)
- I = 发光强度
d = 距离
参考:
https://en.wikipedia.org/wiki/Inverse-square_law关键见解:
A narrow beam concentrates light into a smaller area, producing 2–4× higher lux than a wide beam at the same height.
Beam Coverage Formula (Practical Calculation)
To compare narrow vs wide beam in real projects:
D ≈ 2 × H × tan(θ/2)- D = beam diameter
- H = mounting height
θ = beam angle
示例:
At 3m height:
- 30° beam → ~1.6m coverage
60° beam → ~3.5m coverage
Narrow vs Wide Beam by Ceiling Height
| 顶棚高度 | Recommended Beam | 原因 |
|---|---|---|
| <3m | 60°–90° (Wide) | Better coverage |
| 3–4m | 40°–60° | 平衡 |
| 4–6m | 20°–40° (Narrow) | Higher lux |
| >6m | 10°–25° (Narrow) | Deep penetration |
Based on practical IES lighting design principles:
https://www.ies.org/standards/
制造商洞察
In commercial lighting projects:
- Over 60% of lighting complaints are caused by incorrect beam angle selection
- Not by lumen output
For ceilings above 5m:
Using 60° wide beam often results in:
- flat lighting
- insufficient brightness
Recommended solution:
使用 24°–36° narrow beam
Improves contrast and visual impact
Beam Angle vs Fixture Spacing
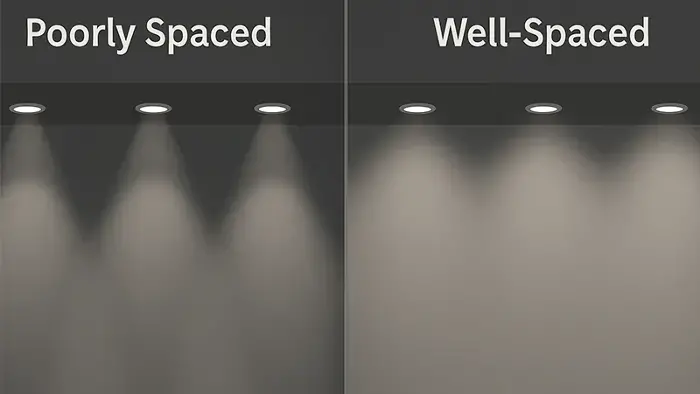
Even with correct beam type, spacing matters.
Spacing ≈ Height × (2 / tan(θ/2))示例:
3m + 30° → spacing ≈ 3.5m
Real Commercial Applications
Retail Lighting
- 3m ceiling
- 40° beam
- Balanced visibility and coverage
Hotel Lobby
- 5m ceiling
Combine:
- narrow beam (accent)
- wide beam (ambient)
Art Gallery
- 4m ceiling
- 15° narrow beam
High contrast lighting
Reference (retail lighting guide):
https://www.ies.org/store/ies-lighting-for-retail-applications-rp-29-16/
Common Mistakes When Choosing Beam Angle
- Using wide beam for high ceilings
- Using one beam angle everywhere
- Ignoring spacing rules
- Focusing only on lumens
Troubleshooting: Narrow vs Wide Beam Problems
- Too dark → beam too wide
- Too bright spot → beam too narrow
- Uneven lighting → spacing issue
- Flat lighting → no beam layering
Before Buying LED Spotlights (Checklist)
- Ceiling > 4m? → choose narrow beam
- Need accent lighting? → choose narrow
- Need uniform lighting? → choose wide
- CRI ≥ 90? → better visual quality
How Professionals Combine Multiple Beam Angles
In high-end commercial projects, using a single beam angle across the entire space is a common mistake that leads to "flat" and uninspiring environments. Professional designers use Layered Lighting to create depth, focus, and visual comfort.
1.The "Accent + Ambient" Combo
This is the most standard professional setup for retail and hospitality.
The Strategy: Use 15°–24° narrow beams to highlight specific products or features (Accent), and 60° wide beams for general circulation areas (Ambient).
The Benefit: It creates a 3:1 contrast ratio, which naturally draws the customer’s eye to the merchandise while ensuring the space feels bright and safe.
2.The "Wall Washing + Task" Combo
Common in art galleries and modern offices.
The Strategy: Use 36°–45° beams pointed at walls (Wall Washing) to make the space feel larger, combined with 24° beams over desks or exhibits (Task).
The Benefit: It reduces eye strain by providing vertical brightness while maintaining high-intensity light where work is being done.
3.Avoiding "Hot Spots" with Overlapping Beams
When spacing fixtures, professionals aim for a 20%–30% beam overlap.
If beams don’t overlap: You get dark "scallops" on the walls and uneven light on the floor.
If overlap is too high: You waste energy and create "hot spots" that cause glare.
Conclusion: Narrow vs Wide Beam — Which One Is Better?
Neither is “better” — it depends on application
Narrow beam = precision + high intensity
Wide beam = coverage + uniformity
The correct choice depends on:
ceiling height
lighting purpose
spacing design
B2B工程建议
For commercial projects:
- Request beam angle simulation
- Verify spacing and lux distribution
Use mixed beam strategies
Our engineering team can support Dialux simulation and beam angle optimization before production.